Users" experience with your website is crucial for stable business growth. Buyers won't shop in the store where they can't find items they need and have to battle the UI constantly. This is why adding products to collections in Shopify is so important. Product groupings allow customers to find relevant goods and continue their shopping journey easily. However, not everyone is familiar with collections. Our team at Mipler, though, has enough experience with collections that we want to share with our visitors. So join in to learn more about collections in Shopify.
What are Shopify collections? Examples of collections you can create
Shopify collections are custom groups of products you curate to improve navigation and sales.
They let customers browse related items together, much like departments or shelves in a store.
For
example, you might create collections by:
- Audience (e.g. “Men’s” vs. “Women’s”)
- Product type (e.g. “Rugs” vs. “Coffee Tables”)
- Color/size/price, or for specific seasons and events (e.g. “Winter Sale,” “Holiday Gifts”)
- You can also have promotion-based collections like “On Sale” or “Clearance,” as well as popular shop-style collections like “New Arrivals” (items added recently) and “Best Sellers”.
Examples of common Shopify collections include:
- By Audience: Men’s vs. Women’s products (e.g. Men’s Shoes, Women’s Apparel).
- By Category: Specific product types (e.g. Rugs, Coffee Tables, Smartphones).
- By Attribute: Color or price (e.g. Blue Accessories, Under $50 Deals).
- By Occasion/Season: Holiday-themed or seasonal goods (e.g. Summer Essentials, Christmas Gifts).
- By Promotion: Sale or new-item groupings (e.g. “New Arrivals”, “Black Friday Deals”).<
All together, collections improve the shopping experience by grouping related items, making it easier for customers to find what they want.
What types of collections does Shopify allow to create? Manual vs Automated collections

Shopify supports two collection types: Manual and Automated.
- Manual Collections: You pick up every product. You create the collection and then search or
browse your catalog to add specific items. Manual collections are easy and provide complete control, best
suited to small and curated collections or one-time collections (such as an "Editor's Choice" list or a
temporary promotion). Nonetheless, they will need continuous work to sustain them, considering the variation
in inventory.
- Automated (Smart) Collections: These are conditions or rule-filled collections. When you
create a smart collection, you specify some criteria (e.g. product tag, price range, vendor, etc.) and
indicate whether the products should fulfill all or only any of these conditions. Any matching product is
then automatically added to Shopify.
For example, a smart On Sale collection would be all products where Price > 0 or Inventory > 0. There are 60 possible conditions in automated collections. When put in place, they do not need a lot of care. Shopify is updated as they fulfil (or fail to fulfil) the rules of products. They work best with a large inventory and regular groups such as new merchandise, stock turnover, or seasonal groups.
|
Collection Type |
Definition & How it Works |
Ideal Use Cases |
|
Manual |
You select and add products yourself via the Shopify admin (Products > Collections). The collection only contains exactly the products you choose. You cannot change a manual collection to automated later. |
Small or unique sets: one-off promotions, highly curated lists, or editor’s picks (e.g. a single-season or limited-time collection). Good when only a few products fit together without common attributes. |
|
Automated |
Shopify automatically adds products meeting your set conditions (up to 60 rules). Specify rules like tags, price, vendor, etc., and whether products must match all or any conditions. After creation, update conditions to change contents. |
Large or dynamic groups: best for ongoing categories (e.g. “New Arrivals,” “Top Sellers,” “Sale Items,” “Winter Collection”). Saves time for big inventories and seasonal/recurring promotions. |
How to manage Shopify collections
Managing collections effectively means keeping them organized, up-to-date, and optimized. Here are key tips and steps:
- Edit Collections in Admin: In your Shopify admin under Products >
Collections, click on a collection to update it. For a manual collection,
scroll to the “Products” section, search or browse, and add or remove items. For a smart
collection, edit the “Conditions” section to refine which products are included
(e.g. change filters or add new rules).
- Sort Products Within Collections: After adding products, set the collection’s sort
order so top items appear first. In the collection editor, choose “Sort” (e.g. Best selling,
Newest, Price, Manual). For manual collections, you can also drag-and-drop products if you choose
“Manually” as the sort.
- Bulk Editing & Exports: For large stores, use Shopify’s bulk editor or apps to
update many products/collections at once (e.g. change tags, prices). Mipler’s Flow
tool can automate exports of collections, listing all products, counts, and sales data, which helps in bulk
analysis.
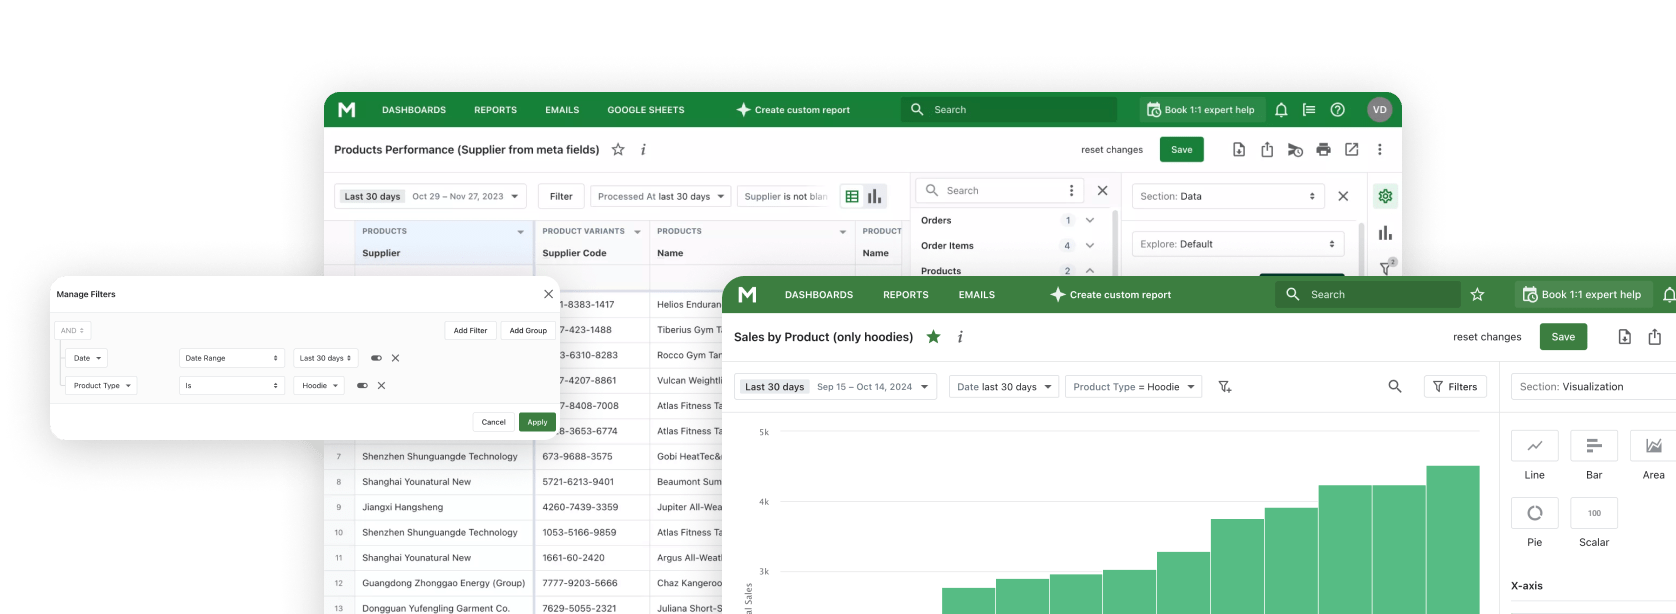
- Analytics & Reporting: Use reports to track collection performance. Shopify’s
default analytics lack a clear “sales by collection” summary, but Mipler’s Sales
by Collection report fills this gap by listing each collection’s orders, quantities and
revenue. Analyzing top/bottom collections helps you decide where to focus marketing or
promotions.
- Consistent Organization: Keep your collections thematically consistent. Don’t throw
unrelated items together; for example, don’t mix blue and pink accessories in a “Pink
Accessories” collection. Customers expect coherence – inconsistent collections can confuse
shoppers.
- Avoid “Dump” Collections: Don’t create catch-all collections with no
clear theme. Such “dump collections” (e.g. a single collection for everything on sale) can
clutter the store and deter buyers. Instead, break broad ideas into focused collections.
- Use High-Quality Images and Descriptions: Make your collection pages visually appealing.
Upload clear, relevant images for each collection, and write a concise description explaining what products
it contains. Better images boost user confidence and click-throughs. Also edit the SEO title/description (in
the collection’s search engine settings) to include keywords and a call-to-action.
How to add a collection to a page in Shopify
After you have collections, you will wish that customers could see them. Collection feature, either on your home page or any custom page can be enabled through the themes editor of Shopify:
- Selected Collection on Home page: In Shopify admin panel, go to Online Store >
Themes, and click on Customize to match your live theme. On the sidebar of the
theme editor, there should be an area called "Featured Collection" or "Featured
Products". Then press the button titled Select collection and choose one of
them. This will display the products of the collection in a grid on your home page. You may add more
featured collections in case you wish to feature a number of collections.
- Collection List (Link Blocks): Or more simply, add a "Collection list" list to display
collection links rather than specific products. Go to the theme editor, add a section Collection list. You
will be shown blank blocks, you must simply choose each block and select a collection for it by clicking the
Select collection and allocating a collection to it. This forms a gallery of collection cards (which can
contain images and titles) which are connected to each collection page. This works well in sending visitors
to various categories, through the homepage.
- Pages and Custom Layouts: Shopify 2.0 themes allow one to add sections to any page. The
theme editor will allow adding a Featured collection or a Collection list in, e.g. your About page or a
landing page. To be even more customised, page-builder apps such as Shogun give you the option of
drag-and-drop Collection items anywhere on a page (a search and an embedded collection in your custom
layout).
- Navigation Menus: Don’t forget to make links to your collections on site menus. Online Store > Navigation allows you to edit the menu that you want to use (e.g. the main menu or the footer) and add a menu item, which links to your collection page. This makes sure that your customers are able to go through collections through links provided to them through your site.
You can make pages and menus easily reachable by adding collections to them. To illustrate, a feature such as a New Arrivals or a Best Sellers collection could be featured on the home page whereas collections of specific product (e.g. Men Shoes) can be linked in the upper nav.
What to do if you can’t add products to a Shopify collection
Sometimes merchants run into issues when trying to add products to a collection. Here are common causes and fixes:
- Automatic vs. Manual Collection:Automatic collections only include
products that match their conditions. If you try to add a product that doesn’t meet those rules, it
won’t appear in the collection list and you can’t add it manually. To fix this, either adjust
the product (e.g. tag it or change its price) so it meets the conditions, or make the collection
manual instead. Note that Shopify does not allow converting an automated
collection to manual (or vice versa) – you’d need to recreate it if needed.
- Product/Collection Availability: In Shopify 2.0+, products and collections must be
published to a sales channel. If a product is “Draft” or its status isn’t set to
Active, or if it’s not available to the Online Store channel, it
won’t show up on your site even if it’s in a collection. Likewise, check that the collection
itself is published (use the “Manage” button under Sales channels in the collection editor). To
resolve this, open the product page, ensure Product Status is “Active”, and
under Manage sales channels, check that “Online Store” is selected. Also
confirm the collection is published to the correct channels.
- Theme/Cache Issues: Occasionally, the Shopify admin UI may glitch. If a product truly meets
all conditions and is active but still won’t add, try refreshing the browser, using a different
browser, or clearing your cache. Logging out and back in can also resolve minor sync issues.
- Duplicate or Exceeding Limits: Shopify collections have limits (e.g. up to 5,000 products
per collection). Ensure you haven’t exceeded any store limits. Also check that you’re not trying
to add the same product twice via different methods.
In summary, if adding fails, double-check your collection’s type and rules, and verify product visibility settings. Once those are correct, you should be able to include the product in the desired collection.
Difference Between Shopify Collections and a Product Catalog
The Shopify product catalog holds all of your items inside. It's a big list of everything you sell. While you can add all your goods into one collection, it is still different. There are two main differences between these two features.
Consistency. Your shop must have a catalog because buyers won't know what you are selling without it. It is a constant for any Shopify store. However, you don't have to create Shopify collections. While they are useful, many small shops can easily go without them. Overuse of any tools, even effective ones, can bring more trouble than benefit.
Customization. The catalog can be rearranged and sorted, and its design may be altered, but it will always show all available items from your inventory. When creating collections in Shopify, you can add any products to them. They may hold any number of items, and you can hand-pick each one to add. You may think of collections like shelves inside one big dresser (your catalog).
How to create a best seller collection in Shopify
A “Best Sellers” collection showcases your store’s most popular items. Here’s a proven approach:
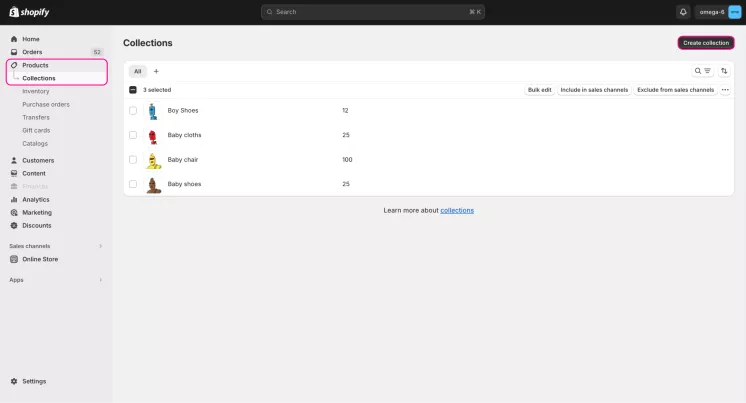
- Create a new collection: In Shopify admin go to Products > Collections,
click Create collection, and give it a name like
“Bestsellers”.
- Set to Automated: Choose the Automated (Smart) collection type. This lets
Shopify populate it for you.
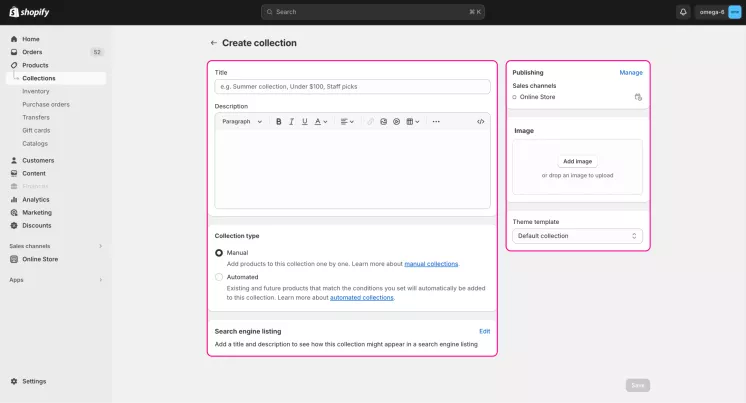
- Use broad conditions: In the Conditions section, set open criteria so almost all products
qualify (for example, “Product price > 0”). The goal is to include essentially your entire
catalog, then rely on sorting for ranking.
- Save and sort: After saving, scroll down to the Products section. There,
use the Sort dropdown and select “Best selling”. This tells
Shopify to display items in order of their total sales. The result is that the highest-selling products will
appear at the top of the collection page.
- Review and refine: Remember that Shopify’s “Best selling” sort uses
all-time sales data. If you launch new hot products, consider periodically updating which products qualify
(e.g., remove discontinued items) or using an app for more advanced sorting.


How to assign products to specific collections?
Knowing how to make a collection on Shopify, now it's time to figure out how to add products to the collection on Shopify. The process will be different for manual and automatic collections. Let's go through each one since both are important in their own right.
Manual
First, you need to open the needed collection by clicking on it on the list. The Shopify collections list can be found in the "Products – Collections" section of the admin panel.
Scroll down to the "Products" section when you open a collection. You can find needed items via the search bar or manually from your catalog by clicking the "Browse" button. This menu also allows you to change a type of sorting in the collection, for example, by best-selling items. Don't forget to save your collection before closing the tab. Otherwise, you must repeat all the steps.
Automatic
Once again, open the needed collection by clicking on it. The Shopify collections page is on the "Products – Collections" tab.
Scroll down to the "Conditions" section when you open a collection. There, you can set conditions by which items will be automatically added to a collection. For example, you may set a condition by which only items of a certain type that cost more than $50 will be added. You can also decide if all conditions must be met or if only one will be enough, like adding products above the $50 price and\or items of a certain type.
How to add collection links to navigation?
Now you know how to add products to Shopify collection. However, users must find your collections somehow, or they will be useless. For example, open them from the navigational menu. To add Shopify collections to the navigation, you must do these steps:
- Log into your admin account and go to the "Online Store – Navigation" section.
- Click on the menu where you need to place the link in the opened tab.
- Scroll to the "Menu items" section and click the "Add menu item" button.
- Enter the name for the navigation link.
- Scroll to the "Link" section, choose "Collections", and pick the one you need.
- Click the "Add" button, and don't forget to save changes.
Explore related reports
How to place a collection on the store's home page?
The other important way to showcase your collection in Shopify is to put it on the website's home page. It is the most visited place for most websites. What is a more fitting place to display your collections? Featured collections can then be checked with the help of Mipler's Sales by Collection report. You may learn more about what people aim at from the starting page.
How to add a featured Shopify collection on the home page
To put up one collection as featured, navigate to the "Online Store – Themes" section of your admin panel. It should be in the menu on the left. Your current theme will be at the top. Click the "Customize" button close to your current theme. In the navigation list, click on the "Featured collection" and then "Change". If you don't yet have a featured collection widget, click "Add section" and choose it. Now, you can select one theme and customize it.
Note: Don't forget to save changes by clicking the "Save" button on the top-right.
Adding several collections to the home page
But how to create collections in Shopify and showcase several on the home page at once? You just need to open "Online Store – Themes" section, click "Customize" on your current theme, and then choose "Add section". Add as many featured collection sections as you need or as your theme allows. The editing process for each is identical to the one described above.
Managing Shopify collections tips
Now you know how to create collections in Shopify, but there are still a few tricks that we can teach you.
Create collections consistently. Don't add extra items that don't fit in the theme when adding products to Shopify collections. Customers who want to see "Pink accessories" probably won't buy a blue scarf because it is not what they came for. These inconsistencies are prone to agitate buyers and leave a bad aftertaste. However, a positive experience and neatly organized store will entice users to return for more shopping.
Do not create "dump collections". Creating Shopify collections without a theme to dump anything you want to promote is a bad idea. These Shopify collections are not very useful and often just clutter the view. If you bombard new users with dozens of random collections, they will most likely wander off to a better-organized shop. You will be better off without dump collections.
Use high-quality pictures. There is no overstating how much the quality of images changes a perspective of your goods. Users want to see a clear picture of what you are offering them. When creating collections, ensure your preview pictures are in high resolution and depict appropriate things. Incoherent images deter way more people off websites than you might think.
Summary
These steps will develop an exciting collection of Best Sellers: new products with good sales history will automatically appear on top due to the sort order. Remember, you will require real sales statistics to make this work - a Best Sellers page does not mean a lot until you have a number of orders. This is a social proof strategy that could increase your conversions on your site considerably because the sight of other customers purchasing these products will work wonders to increase your sales.
Shopify Reports offer valuable insights into the performance of your collections, helping you identify which collections drive the most sales and refine your marketing strategies accordingly.
How to add a collection on Shopify?
You can do it from your Shopify admin panel's "Products – Collections" section. There will be a noticeable green "Create Collection" button. Then, it is only a matter of filling in the needed information and adding goods to the collection.
How to add products to Shopify collections?
Simply click on the needed collection to edit it. In the opened tab, you can pick items manually or set up conditions for automatic filling.
How to place a collection on the navigation menu?
Go to your admin panel's "Online Store – Navigation section. Choose a needed menu, click "Menu items" section, and click "Add menu item" button. Type in the name of the menu link, then scroll to the "Link" section, choose "Collections", and pick the one you need.
How do you make collections appear on the home page?
Navigate to your admin panel's "Online Store – Themes" section. Edit your current theme, and click on the "Featured collection" line to edit it. If you don't have one, click "Add section" to insert one or more if you need it.