Metadata is one of the cornerstones of modern web navigation. Without metadata, any webpage gets shoveled far away — on the second page of a Google search. That's why it is crucial to know what Shopify meta tags are and how to add them. So, let's dive into this topic!
Main types of meta tags in Shopify and their functions
There are many meta tags inside a store's page. However, most users don't need every meta tag Shopify has. Most of them are purely technical, created automatically, and don't require any changes unless there is a specific need. Here are three main meta tags that you will probably interact with:
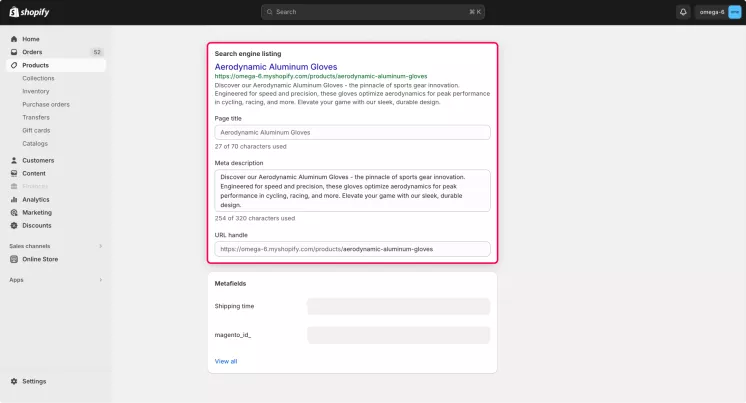
- Meta title.This tag is responsible for the page title shown in the search results. Technically, it is not a meta tag but essentially functions like one. Search crawlers, bots that operate search engines like Google, draw information about the page from this tag.
- Meta description.This tag is very similar to the meta title. It is responsible for the page description in the search results. It is that little bit of text describing the contents of the page.
- Robot tags.These tags consist of follow, nofollow, index, and noindex. They act like a short command to the search bots. For example, noindex tells bots that a particular page shouldn't be shown in the search results.
Meta titles and descriptions are essential for any website. They help search engines know what's on your pages, and users understand what search results they click. Robot tags are useful when you want to hide certain pages, such as technical pages that do not need to be indexed.
How do meta tags affect your Shopify store's SEO?
Meta tags played a bigger role in the 2000s and 2010s than today. Now, content quality and readability for humans weigh more than pure SEO optimization. However, meta tags are still crucial for a good search position. With a proper meta title and description, the effectiveness of your SEO will be improved.
When you add meta tags to Shopify, it is also important to do this knowingly. Writing a description or title that doesn't match the page can damage the SEO. Overmanaging these tags can also lead to a lower search ranking.
So, the takeaway is simple: all pages should have meta tags, but the tags should be appropriate. This way, tags will positively affect your SEO.
Explore related reports
Preparing to add a meta tag to Shopify
There are two ways to add meta tags in Shopify. The default method is automatic. The meta title will be formed from the page's title, and the first few lines of text on the page will be taken as a description. You can also manually add a meta tag to Shopify. This method is preferred because humans can write better tags than the default system.
You don't need much preparation if you want to leave meta tags to automation. But if you want to add them manually, it is best to familiarize yourself with the core principles of SEO for metadata. There is certainly a way to write metadata wrong. Luckily, we will give you some advice further down the text.
How do I add meta tags to my Shopify website?
So, how to add meta tags in Shopify? It is fairly simple if you just need to edit a page's meta title and description. Here are simple steps for that:
- Open your Shopify admin tab.
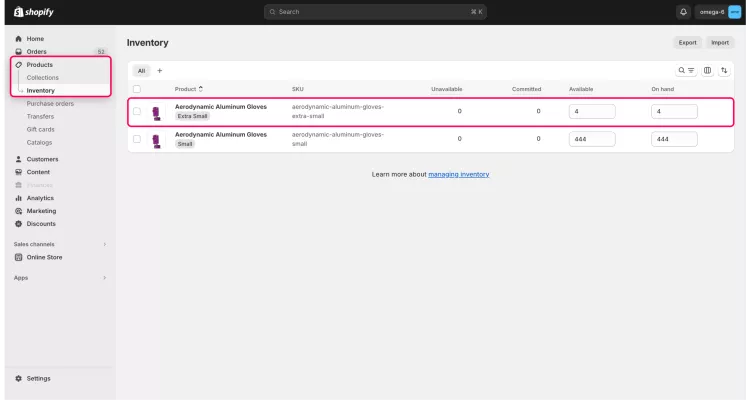
- Choose the page where you want to add meta tags. For example, click on the Products, Inventory, and then on the needed item.
- Scroll down to the "Search engine listing" section. Click "Edit" and change your page's meta title and description.
- Save changes by clicking the "Save" button below.
If you want to edit Shopify's SEO details for the homepage, the process will be a little different. Here is how it goes:
- Click on your sales channel in the admin panel. Your channels are in the "Sales channels" section on the left.
- Click on the "Preferences" subcategory.
- Scroll to the "Title and meta description" section. There, you can edit those tags for the homepage.
- Save your changes via the button below.
How to delete tags in Shopify
So now, let's go through the step-by-step process of how to delete tags on Shopify.
If you need to delete a tag from one entity, you need to:
- Enter your Shopify admin panel.
- Open the list of needed entities, such as items.
- Click on the item from which you need to remove a tag.
- Locate the "Tags" section on the right.
- Click the "x" on the tag you need to delete. Alternatively, click "manage" above the "Tags" section to see and edit Shopify tag list for this item.
- Save the changes in the entity.
If you want to bulk edit tags in Shopify, you will have to:
- Open the entities with tags you need to edit. For example, orders.
- Pick the entities you need to edit by checking the boxes close to them.
- Click the "Remove tags" button and pick the tags you need to remove.
- Save changes.
Adding new meta tags in Shopify
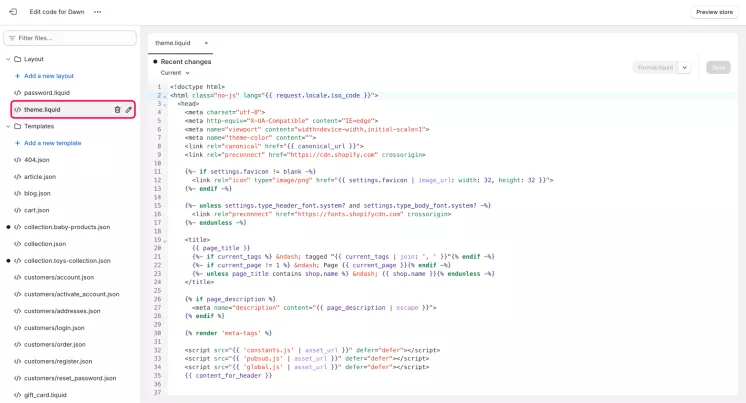
The process differs if you want to add a new meta tag in Shopify. It will go like this:
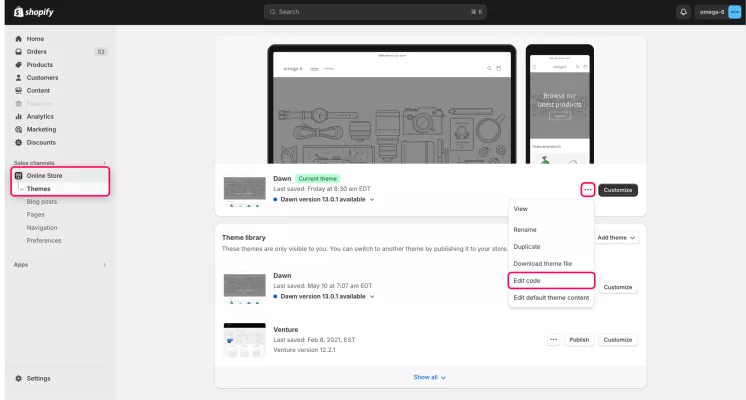
- Click on your sales channel in the admin panel. Your channels are in the "Sales channels" section on the left
- Click on the "Themes" subcategory.
- Hover over the triple dots on the active theme and choose the "Edit code" option.
- Locate and open the "Theme.liquid" file in the editor.
- Write down needed tags and save the changes.
Checking the functionality of the meta tag on your Shopify site
To check if your added meta tags, such as title and description, worked — simply Google the changed page. If tags were changed — you will see a new title and description in the search results.
However, if you need to know the effectiveness of your meta tags, you'll have to run an SEO audit. Without it, you won't be able to tell if chosen tags are affecting your store.
Tips for using meta tags effectively in your Shopify store
As we said earlier, there is a way to write meta tags badly. So here are a few tips to make the most out of your meta tags:
- Don't add it if you don't know it.If you are unsure what the meta tag you're adding or editing does — don't touch it. Better find a specialist who will do it for you. If that is not an option — just let the system do its default thing.
- Start with keywords.When adding a custom meta title and description, it is best to start with appropriate Shopify meta keywords for the page. For example, if the page is about a red hoodie, start a title with "Buy red hoodie".
- Don't overload the tag with keywords.Contrary to the advice above, don't stuff all keywords into one meta tag. This tactic is called "SEO spam", and it hurts the page's ranking.
- Use optimal length.Meta descriptions should be around 150 characters, and meta titles should be around 70. Lower or higher, and they become less effective.
- Don't use cheap tactics.Clickbaits, caps, vagueness, and other tricks are bad for your SEO. Modern bots can identify these tactics and lower your ranking.
Summary
Meta tags are still very important for any webpage. They define how your page will be shown in search results. Shopify can generate them automatically, but you should write them manually to ensure the best performance.
Frequently asked questions about removing tags
1: Where to add a meta tag in Shopify?
If you want to add or edit the meta title and description, you should do the following:
- Open your Shopify admin tab.
- Choose the page where you want to add meta tags.
- Scroll down to the "Search engine listing" section. Click "Edit" and change the tags.
- Save changes by clicking the "Save" button below
If you want to do the same for the homepage, the steps are as follows:
- Click on your sales channel in the admin panel.
- Click on the "Preferences" subcategory.
- Scroll to the "Title and meta description" section.
- Edit tags for the homepage.
- Save your changes.
2: Why is my description or title not visible on Google?
Sometimes, Google can ignore the meta tags you wrote and use its own. It generates those tags based on your page's content.
