Nowadays, shops sell items with diversity and customization options in mind. Industries grew through the decades, and customers" desires grew with them. Now, buyers want more than just functionality. Stores must entice them with different colors, designs, sizes, and other customizable features. Shopify product variants tool is a solution to this e-commerce demand. However, shop owners might need guidance with the setup process for this feature. We created this article to help users understand and tune item variants in Shopify.
What is the Product Variant in Shopify?
Simply put, product variants in Shopify are all the customizable options for items. Sizes and colors for clothes, hard drive capacity, and smartphone memory options are parts of different item variations. The outcome after picking the needed options is a Shopify product variant. But let's see a more detailed example.

Say your store sells different electronics. Smartphones are in stock, and users can choose their design and memory capacity. If a customer chooses a pink design and 256 GB of memory, he just ordered a pink 512 GB variant of the said smartphone. A black 128 GB smartphone will be another product variant.
Items without customization often have just one price tag, simple shipping details, and one ID. The tricky part with variants in Shopify is that they can have different prices, shipping locations, etc. So, if you are adding variants in Shopify – you must individually tune the details of each variant.
Why are Product Variants important for your Shopify store?
The main reason Shopify item variants are such a prominent feature is user experience. If your customers can find and pick different colors, sizes, brands, and other customization options – they will feel satisfied and cared about. Google surveys say that 88% of buyers think variety and choice are important.
Variety is also the key to widening the client base. As a simple example, having the option to choose a clothing item in different sizes with Shopify product variants allows more people to find what they are looking for. This way, you may expand your user base and grow your revenue.
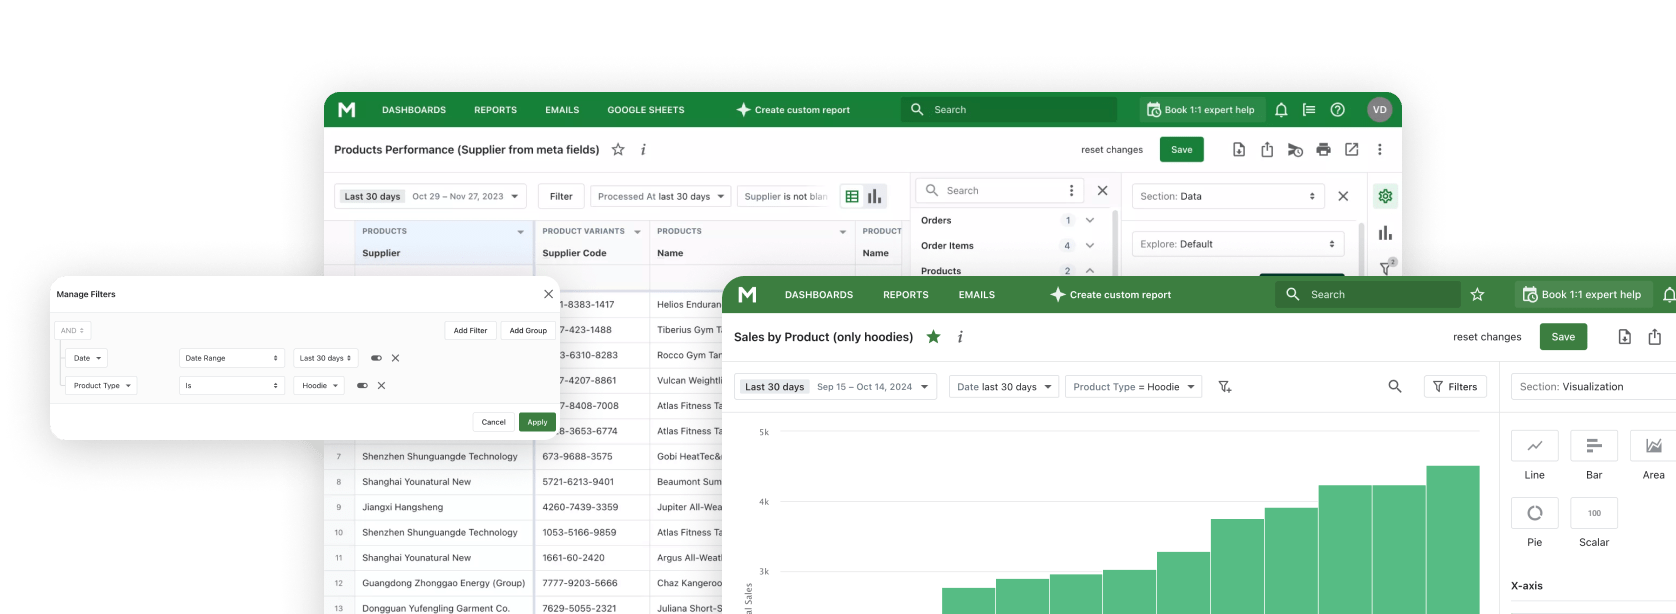
Lastly, by adding variants in Shopify, you upgrade inventory management. You may use Shopify Sales by Variant Reports to discover what particular goods are popular to order more or see which unpopular variants need additional promotion. It is possible even to notice growing trends. For example, towards Christmas, all clothing in red colors may sell way more than usual.
How to create Products and Variants for them in Shopify?
Let's see how to add variants in Shopify. Firstly, you need to create the product, which will be customized. Enter your admin account and select "Products" on the left. Click the "Add product" button on the right in the opened tab. In the opened menu, you may craft your item: enter the item's name, weight, and price, and customize other important information. Say, we created a basic white shirt.

To then add variant in Shopify, you must follow these simple steps:
- Scroll down the item creation menu to the "Variants" section.
- Click the "Add options like size and colors" button.
- Choose an option that you want to add, like a color, for example.
- Add values for the option, like "orange" and "black".
- Click on the "Edit" button and enter individual info of each variant, like price, picture, and SKU.
- If you need more variety, click "Add another option" and repeat the process for, let's say, size.
- Finally, click the "Save" button to secure all completed work.
After the process, you will have a product with variants. In our example, we end up with a basic white shirt with two color options, orange and black, and some sizes.
Where are product IDs and variant IDs located?
You may require the product's ID or variant to craft a specific theme code customizations. But where can you find it? There is one simple way to see the item ID and a product variant Shopify ID. The process goes like this:
- Once again, enter your admin account and click "Products" on the left.
- Select a needed product.
- You will have an address to this item in your browser's URL bar. Numbers after the word "/products/" are the ID of the selected item.
- If you need an ID of the variant, scroll to the "Variants" section and click on the needed variant.
- Your URL bar will now contain a different address. Numbers after the word "/variants/" will be the searched variant Shopify ID.
You may also see the same IDs on the store's frontend. Just visit the item's page and choose the needed variant through customization. The ID will be the last string of numbers in the URL.
Explore related reports
How many Variants can be created on Shopify?
The highest you can go in Shopify product variations is 100 variants for individual products. Also, each item can have only 3 options, like size or style.
There are also some restrictions for shops with many product variants in Shopify. Markets with more than 50,000 variants have a forced restriction for the variants uploading. You may load only 1,000 variants within one day through the app or a CSV file. You may exceed this limit with a "Plus" store.
Can you add more than 100 Variants on Shopify?
Basic Shopify variant functionality doesn't allow owners to add more than 100 variants for one item. However, there are a few workarounds for this issue.
Split your products
The simplest way of overcoming Shopify adding variants limitations is to split your items. Instead of creating one product with 300 variants, you must add 3 separate instances of each item with different variants.
Positive: you don't need much knowledge or third-party tools to do it. This option falls within the scope of basic product managing skills and doesn't require any investments.
Negative: your customers might find this solution confusing. Seeing the same item split between several instances may cause users to drift away to a different, simpler store.
Create a custom script
Programmers can craft different scripts that may assist with said issue. For example, build on top of the splitting. JS code can seamlessly transport buyers to the needed split item page when they choose a needed variant. Meanwhile, it will appear to them that the item they search for has only one instance with more variants while the code works its magic.
Positive: this option is more comfortable for the user. Clients won't have to find their way through split items and thus will shop easily.
Negative: you will need programming skills to use this method. You may hire a developer or do it yourself, but it will require weather funds or knowledge.
Use third-party apps
Some third-party apps or modules, like Infinite Options or Product Builder, can help you with limitations. Some simply remove the limit, while others let you bundle items, for example.
Positive: smooth option for admin and users. Apps and modules are usually easy to work with and flexible in their abilities.
Negative: some third-party solutions have a price tag and can have compatibility issues. There are plenty of free apps and add-ons, but you should test them and make backups cause some may have compatibility issues with other modules.
Is there a bulk edit tool for Variants in Shopify?
Let's say you have a dozen products with nearly 100 variants each, and you need to edit prices for all of them. Doing it manually will take days out of your time. Luckily, there is a built-in bulk edit tool for Shopify added variants. You may use it like this:
- Log into your Shopify admin account.
- Click on the "Products" option on the left.
- Select "All products" in the drop-down menu below.
- Select needed products by clicking individual checkboxes or a fixed checkbox on the top to select every item.
- Click the "Edit products" button on the right of the fixed checkbox.
- You will be redirected to the sheet with the details of all chosen items, where you may edit them.
Individual variants of each item will be displayed beneath it in dropdown sections. If you need to edit different fields that are not displayed, click the "Add fields" button on top of the list to add or remove editable fields.
How do you hide out-of-stock Variants from your shop?
So, you know how to add more variants on Shopify and how to edit them. But what about hiding unavailable ones? When you add a variant in Shopify, the system automatically hides those without stock. However, you can control it manually. To do so, you must:
- Log into your admin account and select the "Products" option on the left.
- Click on the certain item you need to hide variants of.
- Scroll to the "Variants" section and edit the needed one.
- Uncheck the "Continue selling when out of stock" option if it was checked.
- In the "Quantity" field, enter a "0".
- Don't forget to click the "Save" button.
You may also use apps and add-ons that will hide out-of-stock items for you. They often provide an automatic hiding functionality.
Tips for creating high-quality Shopify product variants
While adding variants in Shopify is useful by itself, a few tips will help you deliver the best user experience for your clients. They are as follows:
- Consistent naming. If you have lots of items with customization, make sure that the naming of options is consistent. For example, if your products have different color options, name this option "color" throughout all of them. Don't use synonyms like "style" or "palette" for the same option. It is confusing for clients.
- Image linking. Properly link pictures of item variants to said variants. If clients click on the red shoes, they must see red shoes, not black or white ones. Most users will be discouraged from buying items with no adjacent pictures. You can see it yourself if you use Sales by variants Mipler reports. It is a handy tool to assess and adjust your business strategy.
Summary
Shopify product variants are almost necessary for any medium- and large-scale shops. The main reasons to incorporate it are enhanced user experience, widened client reach, and better inventory management. Potential customers will appreciate the comfort of smooth item customization and a wide range of options. At the same time, you can neatly manage your stock to sell it more efficiently.
Creating and editing product variants happens through the admin panel. There is a "Products" tab, where you can manage goods and their variants if you click on items and scroll down to the corresponding section.
Shopify Reports provide detailed analytics on the performance of product variants, helping merchants understand which options are most popular and optimize their offerings accordingly.
You may easily find product and variant IDs if you select the needed item and look at the page's URL. Corresponding IDs will be after the words "/products/" or "/variants/".
There is no way to add more than 100 variants to one item in the basic Shopify. However, you can bypass this restriction by splitting variants into a few different instances of the same product, implementing JS code, or using third-party apps and modules.
You may use a built-in bulk edit tool to edit several variants at once. You just need to select a few items at a time in the "Products" tab and click the "Edit products" button.
If you want to hide out-of-stock item variants, you need to uncheck the "Continue selling when out of stock" option in the certain item's tab and set its "Quantity" to "0". The system will automatically hide this variant. You may also use apps for this purpose.